

Building a ghost gun is quite a process. By now you have decided that you want to build an AR, you have read my post on things to keep in mind when Planning Your AR-15 Build and you have at least answered the burning Polymer vs Aluminum question. So, where to start? Well, the first step will be to acquire all of the tools necessary to mill the lower and assemble the rifle. As you read through this, I will identify each tool as one of three categories: Absolutely Necessary (AN), Nice to Have (NH), and Irrelevant (I). For now, I will skip over the irrelevant tools. Necessary tools do not have a replacement. You need them. Nice to have tools can save you frustration, but you can improvise or use a tool you already have in your tool box.
This will be a three-part series. The first section will contain all the tools you need to mill the lower. The second section will deal with tools for installing the lower parts. The third section will focus on tools for upper assembly. In each part, I will start with a TL;DR list.
Part one: Milling Tool
TL;DR
- A Jig (AN)
- Drill Bits
- 5/32” (AN)
- 3/8” (AN)
- 1/8” (NH)
- 31/64” (NH/I)
- 5/16” (AN or NH)
- End Mill
- 5/16” 2F/4F Center cut, XL, Square profile (AN)
- 7/16” 2F/4F Center Cut, Long Square profile (NH/I)
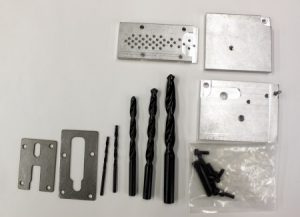
Whether you chose to go with an aluminum lower or a polymer product, you will need three things: bits, a power tool, and a finishing jig.
Selecting a Jig – Hybrid 80, Polymer80, and James Madison Tactical all include a single use disposable jig with their lower. Since the top polymer manufacturers all include them, we will focus the discussion on jigs for aluminum lowers. Aluminum lowers, be it billet, forged or cast, have two major deviations: with integral trigger guard or without. Lowers with an integrated trigger guard are usually a proprietary design, and I would recommend that if this is the route you want to go, buy a matched jig from the same source.
When it comes to metal jigs, there are a few things to look for. If you are planning on purchasing an aluminum jig, then the thing to know is that there is no functional difference between 7075-T6 and 6061-T6. When you get to milling the lowers, aluminum is aluminum. This does not mean that all aluminum jig sets are the same. If you are only planning on doing a few (1-4) lowers on the jig, then aim for the cheapest.
Anderson Manufacturing makes a great set for about $75. If you are planning on doing five or more lowers, you should look for some of the pricier jigs. The features you want in a higher end jig are steel top plates and steel inserts in the side plate holes. Having steel in these critical points will make them harder and less susceptible to wear.
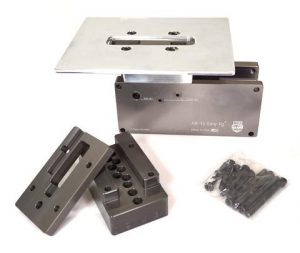
One unique jig option is the Easy Jig, by 80percentarms.com. This jig system is in a category of its own, as it is the only one I have found that integrates the work surface into the jig. If you are planning on using a router, rotary tool or hand drill to complete your lowers, this is the jig to get.
Bits and Bits – To complete a lower receiver, you will need an end mill and some drill bits.
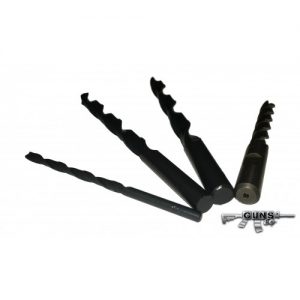
For drill bits, you will need a minimum of two. You must have a 5/32” and a 3/8”. Some jig sets also use a 1/8”, 5/16”, and a 31/64”. If the jig set you chose has a pilot hole top plate, then you will most likely need the 1/8”. If the lower you chose does not have the back section milled out, you may want a 31/64”. The 5/16” bit is designed to cut the trigger hole. The 5/16” bit may or may not be necessary, depending on your choice of end mill. As to materials, coatings, etc., for these bits, high speed steel (HSS) is more than sufficient. If you already have titanium coated, carbide or any other premium bit, use that. The fact is that unless you are doing 100+, you probably won’t even notice any tool wear worth mentioning.
There is a fair amount of deviation in end mills in the world of 80% kits. Some kits come with 7/16” 2-FL, Standard length, while others come with 5/16” 4-FL, X-long. And it goes on and on. So what is the best? That will depend on your power tool, cutting speed and lower material. Aluminum is considered to be a “gummy” material in the machining world. This means that it gets stuck in the mill easily, and can cause your bit to break. In this case, less flutes is better. Stick to 2 or 3 flute, or go slow when you are cutting. For polymer, the material is soft and easy to cut, so number of flutes is mostly irrelevant. The next thing you want to be aware of is overall length. You will need to cut into any standard lower to a depth of 1-1/4”. Add 3/8-1/2” for the jig material, and you are at a good 1-3/4”. The standard length 7/16” end mill is about 2-1/2 in overall length (O.A.L). By the time you chuck it up, you will barely have enough room to maneuver the chuck around the buffer tower. Generally speaking, end mill prices for long and extra long(XL, extended, super, etc) go up exponentially with diameter. I recommend looking for a 5/16” XL end mill. The 5/16” diameter means that you can clean up the trigger hole. Also, it means you don’t need a 5/16” drill bit. You should look for center cutting end mills when you are looking to purchase. Center cut means the blades go all the way across the diameter, allowing you to plunge with the bit. This is pretty critical if you are using a drill press to complete your lower.
Here is a couple of forums discussing end mill choice:
End Mill Recommendations for Aluminum – Practical Machinist
End mills- 2 flute or 4 flute?
That should clear up everything you never wanted to know about bits.
Power Tools – The last thing you will need is some kind of power tool to mill the lower. You have several options, depending on how handy you are and how much you want to spend.
-
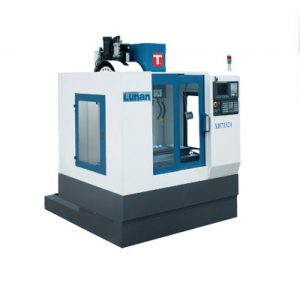
Vertical Mill found on DIY Trade CNC Milling machine. If you have an extra 12 grand laying around and some shop space handy, you could get one of these, take some shop classes to figure it out, and make a few on a vertical mill. A much cheaper path to a CNC mill would be renting shop time from a local CNC job shop. Upside of a CNC mill is they are super precise and will give you a professional product. Downside, this method is the most technical of all the options. If you do not have CNC experience, I would not recommend it.
-
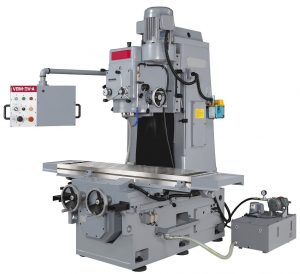
Vertical Mill Milling Machine. For about $800-$1,500 you can get a used manual mill,like this. Milling machines are specifically made to have a horizontal load applied. With a good mill, you will have a smooth table and won’t get jumps and jerks in your work. Pros: you will get almost as good of job as if you did a CNC mill. Cons: it takes up a lot of space and you will most likely need access to 3 phase power.
-
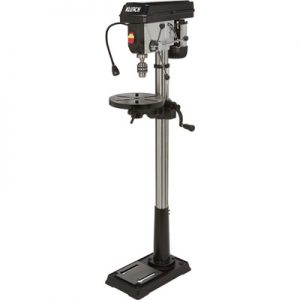
Northern Tool Drill press Drill press. By far, this is probably the easiest choice. You can pick a floor standing drill press up for about $150. Add a xy axis vise (sometimes called a cross vise) and you will have everything you need. Pros: A drill press is an affordable, versatiletool, that once you have one you won’t know how you lived without it. Cons: It will take up floor space, so its not practical for a small house or apartment. Also, the drill press is made for a vertical load (up and down travel, plunging) and not the horizontal load you perform with milling. This may cause some issues with the drill arbor. You should be able to minimize any problems by going slow.
- Router/hand drill/rotary tool. All three of these tools are going to go into one category. For the most part, I would stay away from any one of them. Unless you are opting for the Easy Jig, any one of these requires a very steady hand. Pros: these tools take up almost no space and you probably have one of them. Cons: you have to have a strong and steady hand, otherwise you will ruin your lower.
Well, that’s it for Part 1. Check back next week for Part 2: Lower Parts Installation.